Sketches, Artwork, Quotes & Interviews

Friday, January 22, 2010

Entries Have Been Chosen For a Regional Art Competition & Exhibition at Green Rice Gallery

Link: North and South Exhibition: The entries have been chosen !

Opening reception is on February 5
at Green Rice Gallery in Charlotte


"Quiet"
Ann Rudd
5 x7

Happy to say that this painting was accepted into the show!

Creativity Quote for the Day

From artist Chuck Close:

I have to go into the studio and paint whether I feel like it or not.

Monday, January 18, 2010

Interview with Two Artists: Mike and Donna Brown of Brown's Country Originals


1. Greetings, Mike and Donna! Please tell us a little about
your backgrounds:
We are Mike and Donna Brown, self-taught husband and wife artist team. I work with wood, chalkware, clay and papier mache. My wife works with dried, fresh and artificial flowers and hypertufa. These creative passions led us in 2008 to start Brown’s Country Originals. The name came from living in the country and our last name.


2. When did you become interested in crafting?
It was started when we were very young.


3. How did you learn your current techniques?
Books and articles on the topics.

4. You have a great variety of artwork to offer, from garden decorations to in-home decor. What inspires you?
Life and vintage works.

5. What is your biggest struggle as an artist?
Pricing our work and marketing.

6. What do you find most rewarding in your work?
The joy it brings to other people.

7. What is the best advice you have received, either about creativity or about life?
Do not give up, keep trying.

8. Good advice. Where can we see your work? What are your price ranges?

Our work can be seen on the following websites:
http://www.brownscountryoriginals.com/
http://www.brownsco.etsy.com/
http://www.artsaflutter.com/

Our prices range from $200 to $5.

9. What are your art plans for the next year?
Increase sales.

10. I hope that will go well for you, your works are delightful (I love the springtime Easter bunnies at your etsy shop!)What would you like people to know about you and your creations?
I use recycled paper to make the paper mache clay.
Here are links to some of our work:
http://www.etsy.com/view_listing.php?listing_id=33577102
http://www.etsy.com/view_listing.php?listing_id=37736503
http://www.etsy.com/view_listing.php?listing_id=33853376

In the photos above, you can see some of Donna's hypertufa (light concrete) pieces and a photo of Mike's work shop with some pieces being created. Check out their etsy shop for personable snowmen, Santas, rabbits, jewelry, Valentine items and natural garden decor!


The images in this post belong
to the artists who created them 
and are protected by copyright law.

Thursday, January 14, 2010

I refuse to have Blog Stress!

Well, I can't seem to keep up with reading or writing blog posts.
So there.

For instance, someone posted a tutorial a while back on how to make paper beads, which I really want to try, but I didn't have time to read it at the time, and just skipped it. I do plan to track down and read that post. But generally, when I scan through the reader, there are so MANY photos, products and ideas that I want to check out. How does one keep up? I don't know. I think I will just have to miss out on some good information. Or maybe try to check in more regularly with my very favorite blogs.


Anyway, I don't have any blog-worthy news, but I will post this photo since I am here.

Harvest, this little acrylic painting, was purchased and has a new home in Charlotte!

Saturday, January 9, 2010

Quote for the Day

"How many cares one loses when one decides
not to be something but to be someone." 
~Coco Chanel 

Monday, January 4, 2010

New Year, New Hobby: A Tutorial

Turn your artwork into miniature
art prints on glass tile pendants, key rings, or coasters. If you don't have your own artwork,
you can make these with any printed image of your choice.


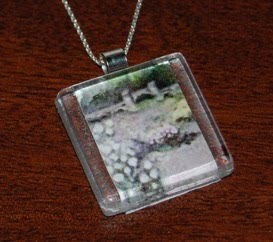
Above: An 8 x 10 inch oil painting, "Gardens at Biltmore," and
5 x 7 inch pastel drawing, "Greek Man with Scarf," become a miniature print pendant and a key ring.

Supplies:
Photopaper
jpg of your choice
Glass tile, 1" square, or larger
Photosafe adhesive
Jewelry bail, if planning to string onto a chain or cord
Note: You can purchase do-it-yourself kits with glass tiles, adhesive and bails; I ordered from a craft supplier at etsy (kit is less than $15, makes 5 tiles.)

Step 1: Choose your image.

Step 2: Crop it to a square shape.

Step 3: Resize the image to 1" x 1" for these 1" tiles, or other size for larger tile or coaster.

Step 4: Be sure to keep the resolution at 300 dpi, if possible. See the don't-do example below:
I forgot about resolution and printed the already loose-style image (below), with a lower resolution of 200 dpi, and lost the brush strokes and edges. I'm still using the pendant and wearing it as a splash of abstract color--because I know what it is, even if no one else does;) However, next time I print photos I will re-print and re-do this with a higher resolution. Also, note that when prints are vertical or horizontal in format (as the Biltmore print), not cropped as squares , the glass tile will exceed the edges. A square fit gives a more finished look.


Step 5: Print onto photo paper. Suggestion: Copy and paste several image options/jpgs into one word document and print onto one photo page, to conserve on your photopaper. Cut out images with scissors or craft knife.

Step 6: Gently shake the adhesive and apply it to the photo (the image side) with a paint brush or sponge.


Step 7: Center and gently press the tile (rough side down) onto the photo. Don't press it too firmly or the adhesive will shift. Let it dry.


Step 8: Optional, number and sign your print on the back.

Step 9: Apply adhesive across the back of the paper to seal it.

Step 10: While the back is wet or dry, apply adhesive to bail, center it on the top back of the tile, with the loop leaning over the top edge of the tile and press gently. Let it dry.


I
If the print is too large, as in the first and last photo here, trim it to fit, using a craft knife and sandpaper.
String your necklace chain, cord, or key chain through the bail and your project is ready to go.

Note to Self

Originally, I started this blog in November 2009, to test out my plan for creating one piece of art per day, either a scribble, a sketch, or a painting. I have concluded that trying to do one per day is not realistic, not comfortably achievable for me, due to full-time job and such. BUT, I read in another blog, an artist's goal of creating one completed piece each week, and that, I can do.

So some of my art goals for 2010 are to:
**Complete one art project per week = 52 new pieces this year.
**At least 1 per month will be in traditional impressionistic style. 

Week 1 is here, so I better get started!

Oh, this remains the Daily Art Snip and I will continue to come by almost every day with a snip, a quote, or an interview. Thanks for visiting!