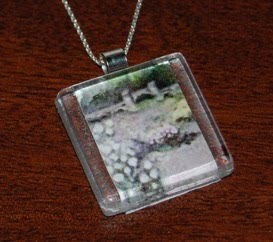
art prints on glass tile pendants, key rings, or coasters. If you don't have your own artwork,
you can make these with any printed image of your choice.
Above: An 8 x 10 inch oil painting, "Gardens at Biltmore," and
5 x 7 inch pastel drawing, "Greek Man with Scarf," become a miniature print pendant and a key ring.
Supplies:
Photopaperjpg of your choice
Glass tile, 1" square, or larger
Photosafe adhesive
Jewelry bail, if planning to string onto a chain or cord
Note: You can purchase do-it-yourself kits with glass tiles, adhesive and bails; I ordered from a craft supplier at etsy (kit is less than $15, makes 5 tiles.)
Step 1: Choose your image.
Step 2: Crop it to a square shape.
Step 3: Resize the image to 1" x 1" for these 1" tiles, or other size for larger tile or coaster.
Step 4: Be sure to keep the resolution at 300 dpi, if possible. See the don't-do example below:
I forgot about resolution and printed the already loose-style image (below), with a lower resolution of 200 dpi, and lost the brush strokes and edges. I'm still using the pendant and wearing it as a splash of abstract color--because I know what it is, even if no one else does;) However, next time I print photos I will re-print and re-do this with a higher resolution. Also, note that when prints are vertical or horizontal in format (as the Biltmore print), not cropped as squares , the glass tile will exceed the edges. A square fit gives a more finished look.
Step 5: Print onto photo paper. Suggestion: Copy and paste several image options/jpgs into one word document and print onto one photo page, to conserve on your photopaper. Cut out images with scissors or craft knife.
Step 6: Gently shake the adhesive and apply it to the photo (the image side) with a paint brush or sponge.
Step 7: Center and gently press the tile (rough side down) onto the photo. Don't press it too firmly or the adhesive will shift. Let it dry.
Step 8: Optional, number and sign your print on the back.
Step 9: Apply adhesive across the back of the paper to seal it.
Step 10: While the back is wet or dry, apply adhesive to bail, center it on the top back of the tile, with the loop leaning over the top edge of the tile and press gently. Let it dry.
If the print is too large, as in the first and last photo here, trim it to fit, using a craft knife and sandpaper.
String your necklace chain, cord, or key chain through the bail and your project is ready to go.


Very fun - this makes me want to make these right now =) Thanks for the instructions and hints!
ReplyDeletegood work done!!!
ReplyDelete